

I once took a leap year from my career in marketing and trained as a baker and pastry chef. It was a wonderful year full of sweets and new flavours but most of all it was the year I fell in love with sourdough baking. If you don’t already have a sourdough starter it’s really easy to make one. All you really need is a jar, flour and water. And maybe just a tiny bit of honey to get it going. In this post I’ll walk you through how to make a sourdough starter at home. It’s easy peasy and you’ll be making your own sourdough bread in no time. But first some sourdough basics.
Understanding the Basics
Sourdough starter is essentially a mixture of flour and water that captures wild yeast and bacteria from the environment. This natural fermenting process is what gives sourdough its characteristic tangy flavor and helps the bread rise. It’s how man have been making bread for thousands of years, long before commercial yeast was available.
What you’ll need to make a sourdough starter
You only need a few items to make your own sourdough starter.
- Flour: Use unbleached all-purpose or whole wheat flour. Whole grain flour can sometimes speed up the fermentation process due to its higher microbial content.
- Water: clean, non-chlorinated water, as chlorine can hinder the growth of yeast and bacteria. Depending on the quality of your tap water you might need to buy bottled water or use a water filter.
- Container: non reactive container, preferably glass, with enough space for your starter to grow. 500ml is enough for making 1-2 breads at a time.
- Kitchen scale: when feeding your starter you need to weigh the ingredients. That’s to make sure you both get the right proportions as well as enough starter to make bread.
How to make a sourdough starter
Creating a healthy sourdough starter to make your own sourdough bread at home takes some time but the process itself is very simple. All you do is mix equal parts flour with equal parts water and let it sit on your kitchen countertop. The next day you discard half the mixture and feed it again. In about a week you’ll be ready to make your own sourdough bred. Let’s get started.
Day 1: initial mix
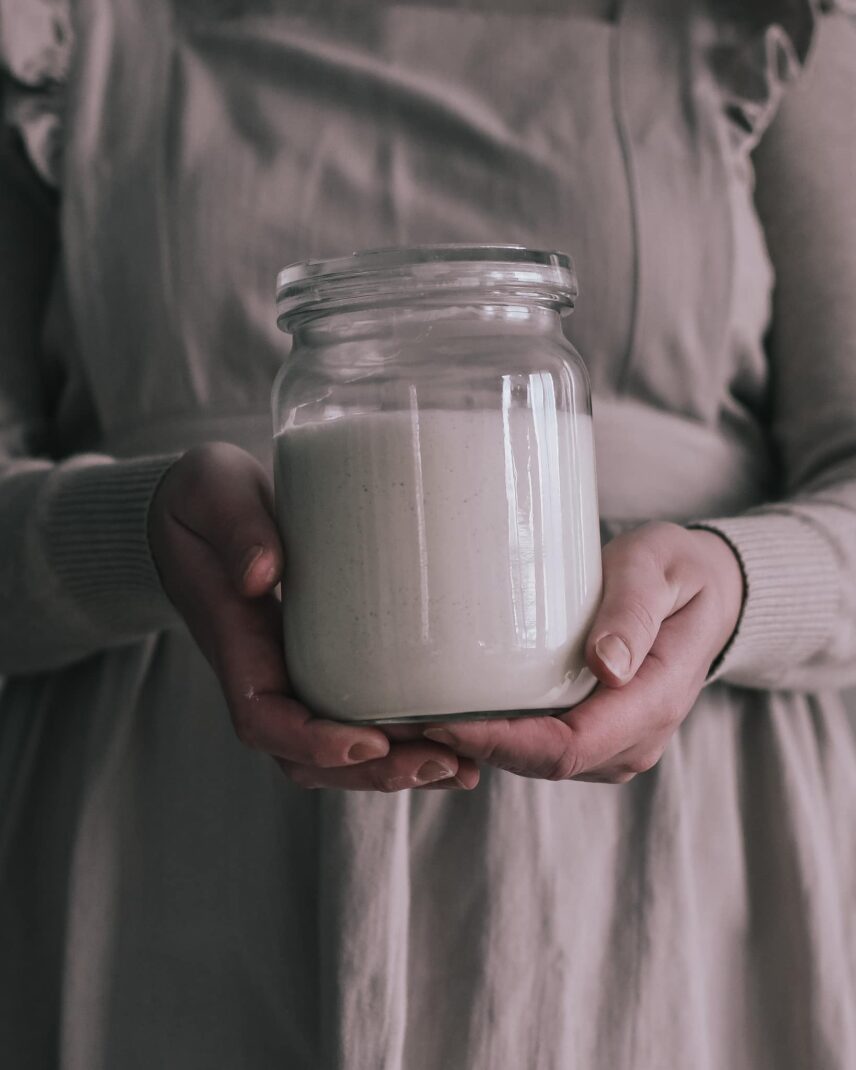
- Combine: in your container of choice, I use a Weck one-pint canning yar, mix 25 grams of water with 25 grams of flour. Stir until the consistensy resembles a pancake batter without any lumps.
Optional: To get the starter going faster you can also add 10 grams of un-pasteurized honey. - Rest: cover the container and place it in a warm spot (around 70-75°F / 21-24°C) for 24 hours or until the next day.
Day 2: discard and feed
- Discard: if you have a lot of wild yeast in your home (which is a good thing when making sourdough) you’ll might start to notice bubbles in you starter but it’s not ready to be baked with yet. It needs to be fed a few more times first. Start be discarding about half of your starter from day one. There should be 25 grams of starter left in your container.
- Feed: add 25 grams of water and 25 grams of flour to your starter. Stir well until there’s no lumps left.
- Rest: cover the container and place it in a warm spot (around 70-75°F / 21-24°C) for 24 hours or until the next day.
Day 3: discard and feed
- Discard: this time discard about 1/3 of your starter so that you have 50 grams left in your container.
- Feed: add 50 grams of water and 50 grams of flour . Stir well until there’s no lumps left.
- Rest: cover the container and place it in a warm spot (around 70-75°F / 21-24°C) for 24 hours or until the next day.
Day 4: discard and feed
- Discard: discard about 1/2 of your starter so that you have 75 grams left in your container.
- Feed: add 65 grams of water and 65 grams of flour . Stir well until there’s no lumps left.
- Rest: cover the container and place it in a warm spot (around 70-75°F / 21-24°C) for 24 hours or until the next day.
Day 5-7: discard and feed
- Discard: discard about 1/2 of your starter so that you have 100 grams left in your container.
- Feed: add 50 grams of water and 50 grams of flour . Stir well until there’s no lumps left.
- Rest: cover the container and place it in a warm spot (around 70-75°F / 21-24°C) for 24 hours or until the next day.
Day 8: you’re hopefully ready to make sourdough bread
By this time your starter should hopefully be bubbly and doubling in size within 6-12 hours. If that’s true you’re ready to start making sourdough bread! If not, keep repeating the last discarding and feeding cycle until you have a bubbly sourdough starter that doubles in size.
Maintaining your sourdough starter
When you have an active, bubbly sourdough starter it’s time to start maintaining it. You can take care of your sourdough starter in two ways:
- Keeping it on the counter: and feeding it daily. This is a good option if you want to make a lot of sourdough bread or make use of your discard in sourdough discard recipes. If you keep your sourdough starter in room temperature you need to discard and feed it daily by using a 1:1:1 ratio of starter, flour and water. Meaning that if you keep 150 grams of starter (which is enough for one bread and have some left to feed) you either use or discard 100 gram every day, keep 50 grams and add 50 grams of water and 50 grams of flour to it. This gives you the livliest starter as it get’s fresh food and fresh yeast every day.
- Keeping it in the fridge: if you don’t bake often you have the option of keeping your sourdough starter in the fridge. This means it hybernates and falls asleep until you need it next time. When you want to bake you simply pull it out of the fridge and feed it with the same 1:1:1 ratio as above. You still need to discard and feed it once a week if you’re not baking more often than that but this way you save flour. You will however end up with a slightly less active starter as it’s kind of sleepy when you pull it out, as we all are if we fo straight from bed to work. But it dies it’s job just fine anyway.